Do you know someone having a baby? Maybe you are having one yourself?
If you are seeking a cute gift idea or a simple favour for a shower than I may have it!
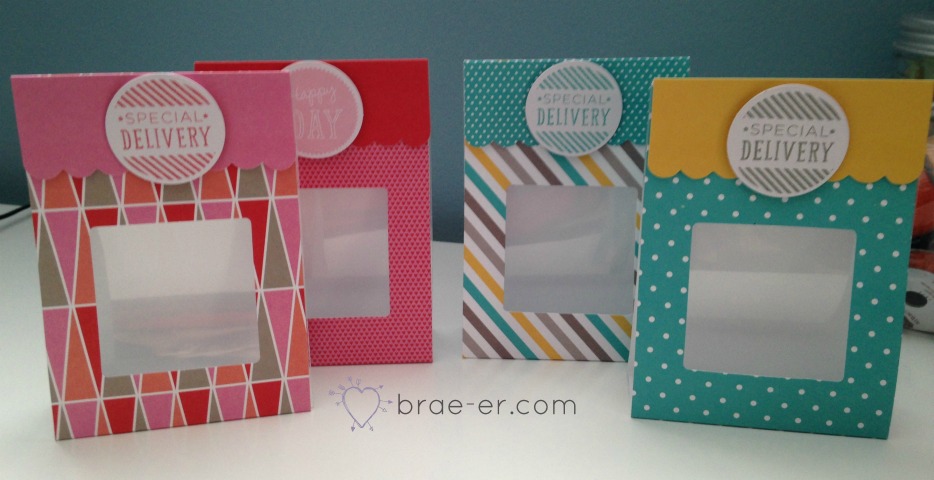
The CTMH Cut Above Treat Bag kits have SOOOOOOO many uses! Pictured is our Valentines Day kit and our Birthday kit… but you don’t have to use them JUST for those events!
Each kit comes with the pre-printed packaging, candy sleeves, the die-cut circles and even stickers that can be added to decorate wrapped candy… now you can see candy did not make it into my bags…. instead it made it into my children!
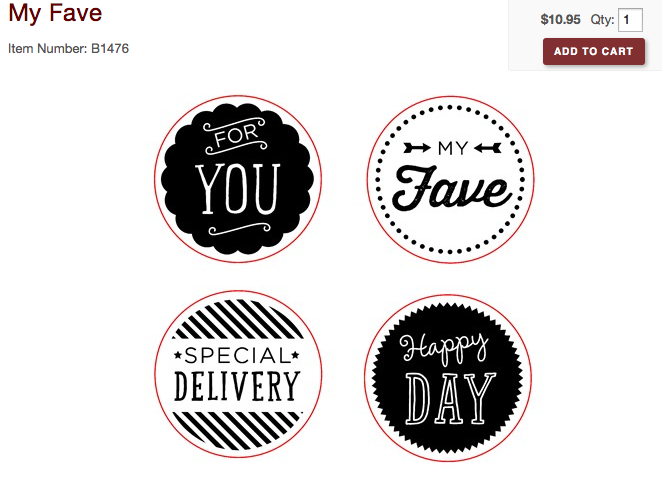
These assemble in seconds- the coordinating stamp ‘My Fave’ allows you to really decide how you want to use these treat bags….
so simple and easy even a child could do it… but, of course, they would eat all the candy so don’t actually have a child do it…
WARNING!! What I am about to show you is HIGHLY addicting!!
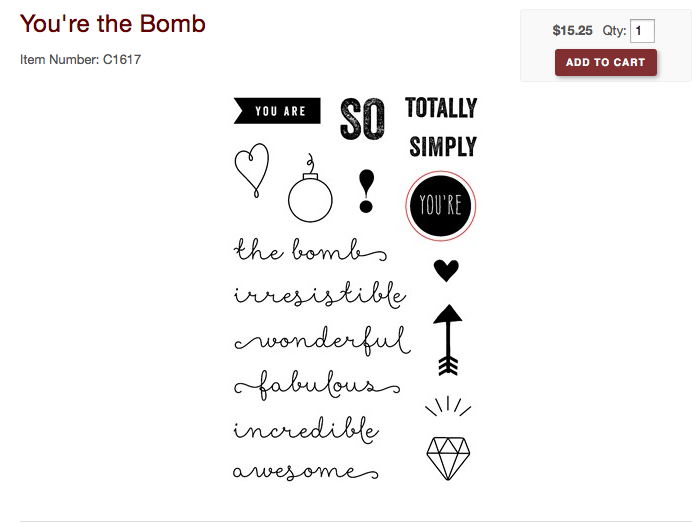
I wanted to share with you a stamp we currently have that is LIMITED in how long we will be offering it AND goes to a great cause- Operation Smile! $3.00 from the sale of every ‘You’re the Bomb’ stamp set goes straight to Operation Smile- a charity that CTMH has supported for years! I encourage you to check out the charity here! They tell their story much better than I ever could.
Upon setting out to create with this cute set (to inspire you to support Operation Smile) I came across the idea that I warned you about.. it is highly addictive!!!
Remember I warned you!!!
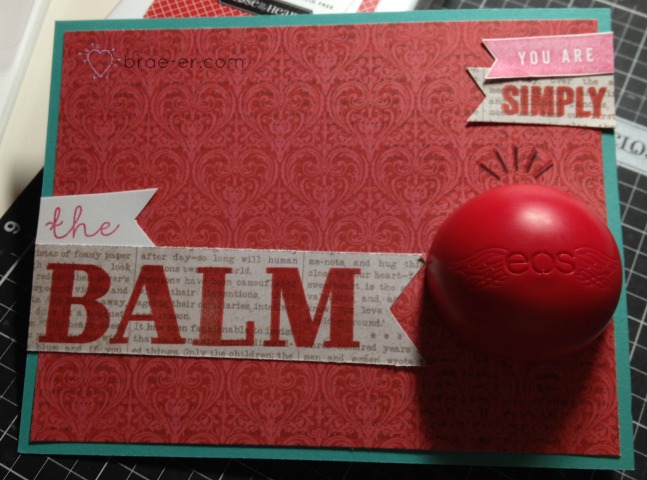
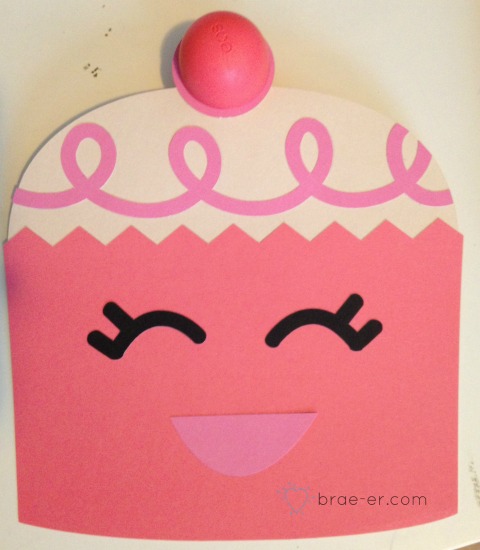
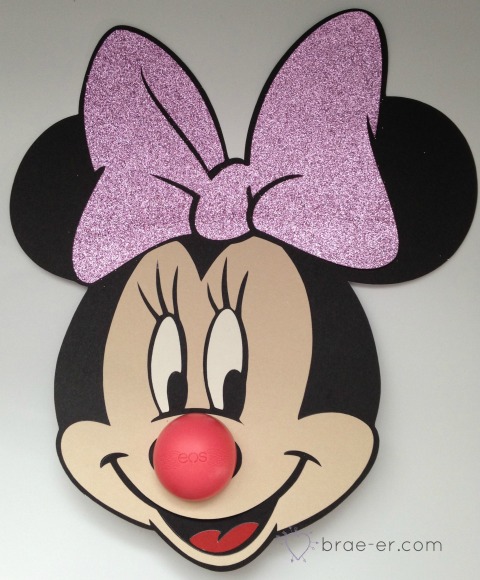
You may have already seen the EOS holders that are hitting the internet. They are all the rage in one of the Cricut groups I belong too. They are fun, simple to make (or not) and are the coolest little gift! The BOMB stamp set became the inspiration for this play-on-words card- You are the BALM!
But of course I couldn’t stop there…
EOS cupcake… what a lovely cherry on top!
EOS Minnie (my Minnie loving girl was so excited about this one!)
and believe me when I tell you I WILL be making more!
(Now I am not a Cricut expert and JUST started using my explore and design space but I will tell you that the circle I placed in the EOS area was 1.5 inches wide. I did a lot of google searches and found some helpful videos showing you how to make these holders… youtube is so very helpful!)
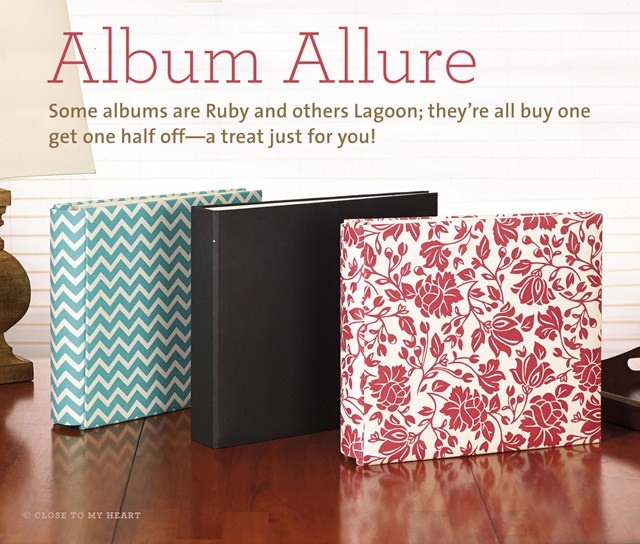
Wondering about the February special from Close to my Heart? Well, wonder no more! I am delighted that February means a BOGO on our new and gorgeous albums! It doesn’t matter the colour or style- all our gorgeous books are buy one get one for half price!
What is so great about our albums? Read on…
albums protect and display your beautiful artwork
our albums come in three colours/patterns: Lagoon Chevron, Ruby floral and black
all colours and patterns are available in post-bound and D-ring (more on those in a minute)
fabric covers are coated to allow for durability and they can easily be wiped clean (a huge perk if you have little hands looking through your albums)
album structure has been reinforced for durability (we have NEVER had an album as strong as these)
fits our memory protectors perfectly (and others will fit in them as well)
can fit 25-50 pages in a book depending on how thick your layouts are
So do I go D-ring or Post-Bound?
There is no right or wrong to these styles, it is just a matter of preference. For years I was a loyal post-bound girl but since we introduced D-ring I find myself switching camps. I love the ease of adding or removing pages (and since I am in and out of my books a lot the D-ring works better for my style).
D-Ring: easily insert pages, 1 1/2inch ring is very strong and will hold pages in tightly, works great with memory protectors with a raised seam (like those that work with Picture my Life)
Post-Bound: combined with our signature memory protectors with lay-flat seams your pages will sit without a gap, pages are extremely secure once in, posts unscrew easily, magnet closure flap over the posts conceals the albums inner workings!
What kind of album are you?? Comment in the comments below and I will draw ONE lucky winner at the end of February to receive a free album of their choice!
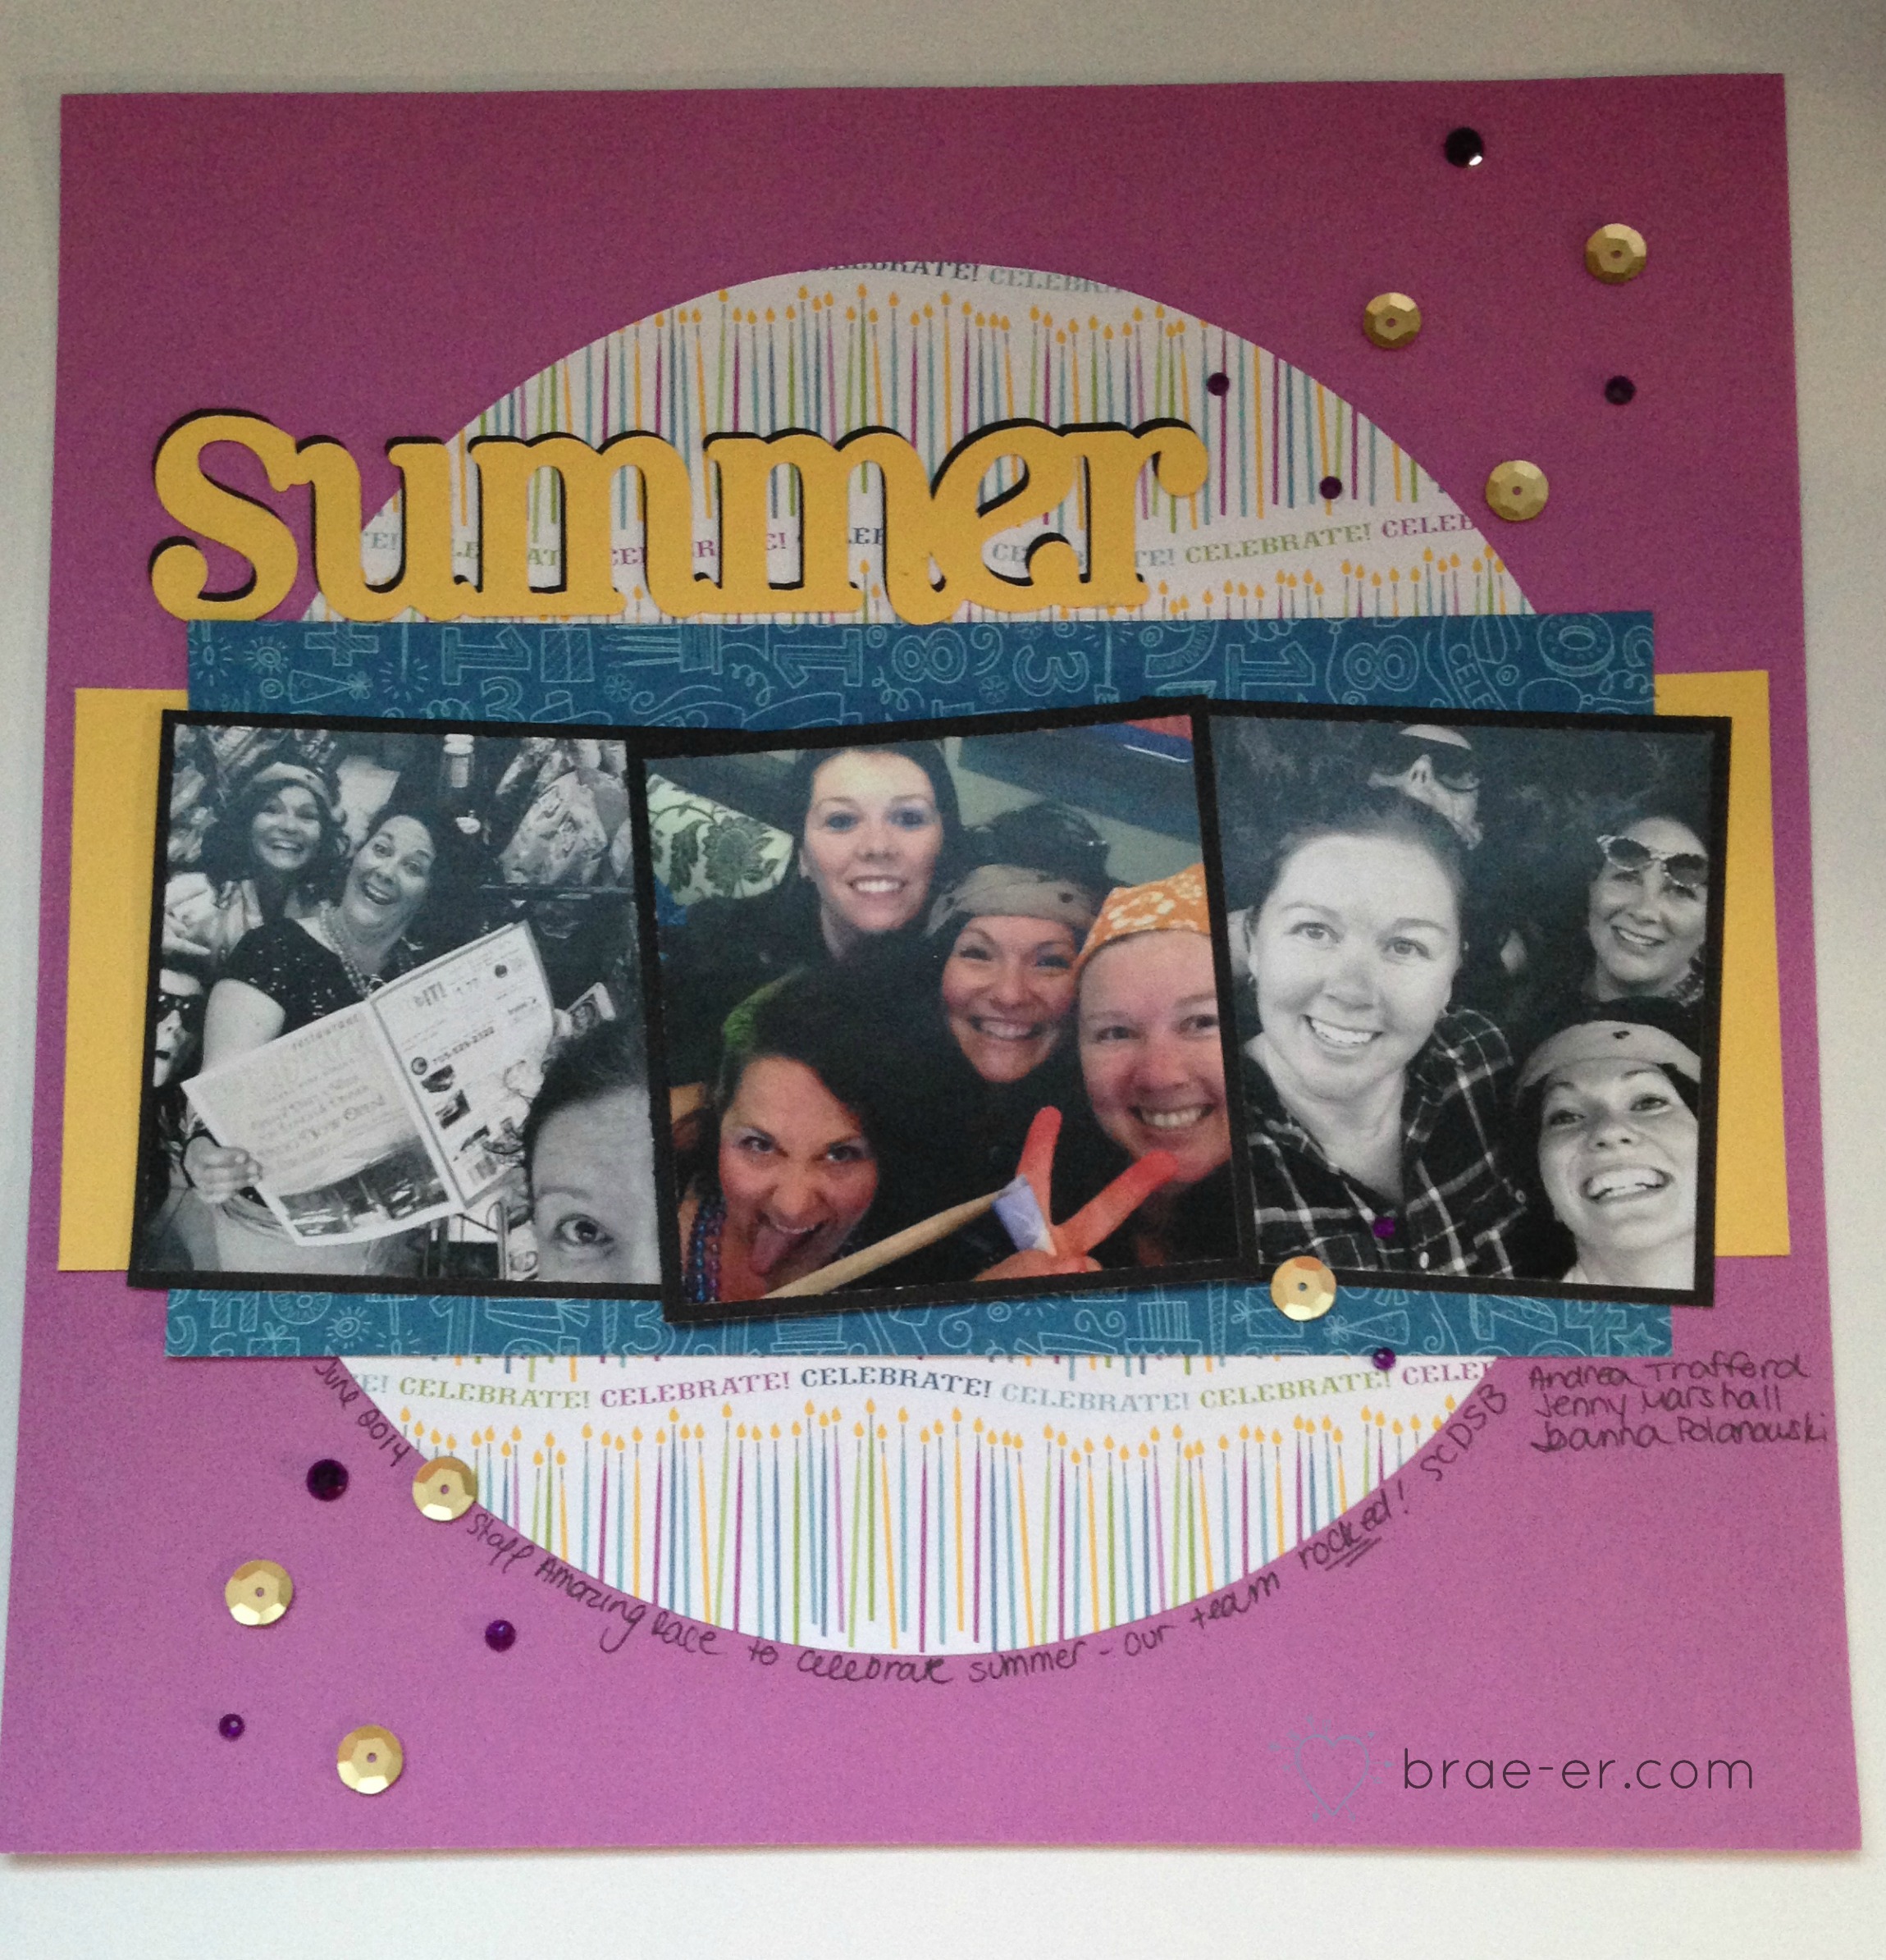
This year I want to participate in more blog challenges- with that in mind and a few hours the other day I set out to find some and came across the Sketch n Scrap page– they have a layout and card challenge! I liked what I saw so decided to play along!
Here is my page- the paper is from the Confetti Wishes paper pack. I added gold sequins and some purple glitter gems left over from an old workshop kit. My title comes from the CTMH cricut Artbooking (the title says endless summer and I just cut off the endless part). I love how it documents our year-end staff party (which is an Amazing Race theme and SO MUCH FUN!)
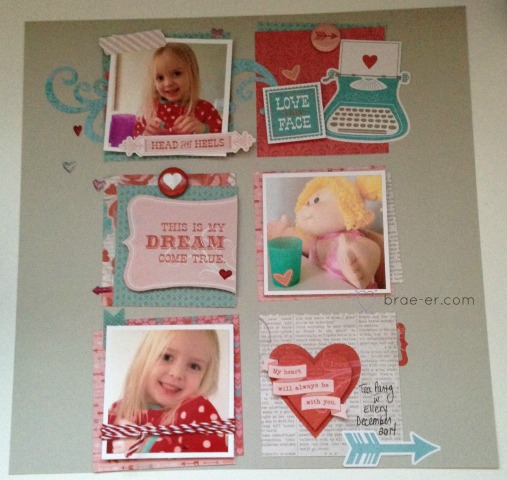
While perusing Pinterest I saw something that made me stop and head on over to the craft room (love those inspirational pins!). I found some photos and got to work creating this adorable one page Valentine layout! (and if you follow me on Pinterest- link on the left- then you will see my inspiration in my Layout Inspiration board).
For this layout I used the CTMH Heartstrings paper, complement, assortment and a variety of accessories: Chalk it Up stickers, puffy stickers and some red bakers twine. I love, love, love, LOVE how it came together!
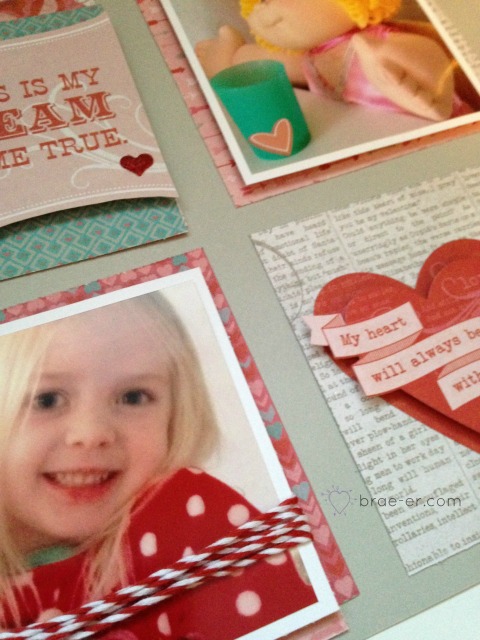
This layout using a lot of layering and foam tape to add some dimension- most of my photos are popped up off the page as well as many of my stickers. The photos below show more of that.
All of my main squares were cut at 3 1/4 by 3 1/4 and then I used smaller pieces to hide behind them or under photos. It gave the look of larger pieces without cutting up all my pretty paper. I may have to try this valentine layout style with some other photos and patterns – so fun!
Welcome to the Cross Canada Blog hop where we are sharing out love of Valentine’s Day! If you have come from Nicky’s blog then you are on the path across Canada to see all our artwork- have fun and don’t forget to leave a little LOVE on every blog by adding a comment!
This holiday is one of my favourite smaller holidays. I love the colours, I love all the fun artwork I can create and I love that the holiday is about love!
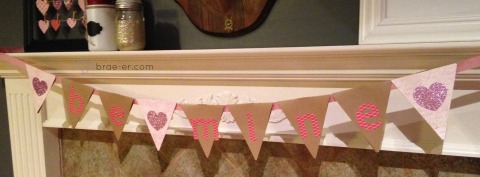
Here is a banner I created for my mantel- I am really enjoying the mantel in the new house and decorating it for the different seasons and holidays. This banner was quickly made using the CTMH Art Philosophy Cricut cartridge and the Artiste cartridge. I used older papers as they had the colours I was seeking (a great way to use up your stash) and added some glitter paper for sparkle.
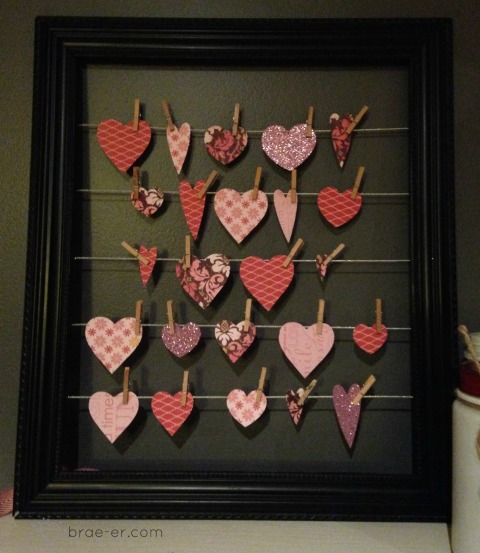
My next project was one inspired by something I saw on pinterest. I used one of our decor frames and simply added hearts cut from all the CTMH cricut cartridges. I used a few different papers and sizes to add some variety. Added some mini clothespins to attach the hearts and done! A cut piece of art for the mantel that I can easily change out later!
Now hop on over to Carol’s blog to see what she has created!
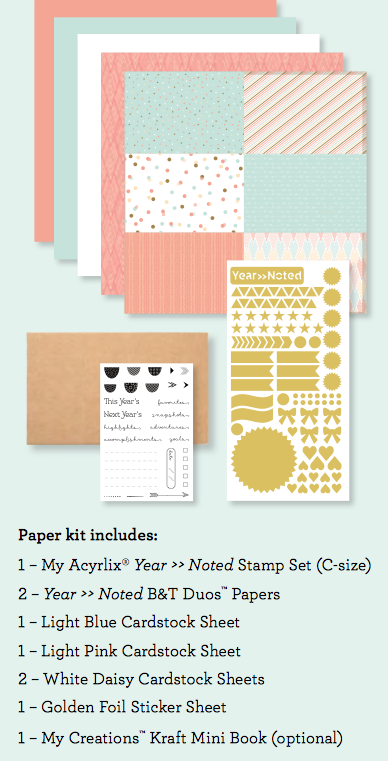
Welcome to my Brae-er’s Team Blog Hop featuring the Year Noted Paper Kit- what comes in the kit is featured below and you can do SOOOOOOO many different things with this! My team will show you some of the fabulous ideas they have come up with in this hop!
Now how can you get this gorgeous kit?
During January when you spend $50 with any CTMH consultant you can purchase this kit for only $5! and for an additional $5 you can also get the Optional Kraft Mini Book- this is such a great deal! If you don’t have a consultant just order in my SHOP here!
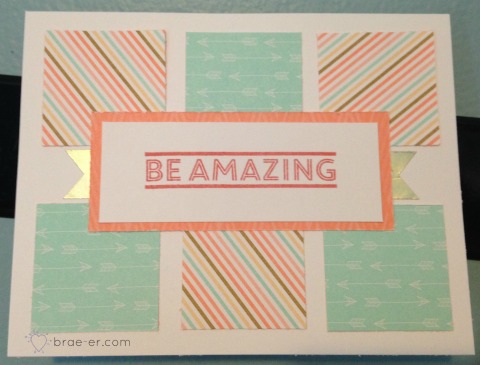
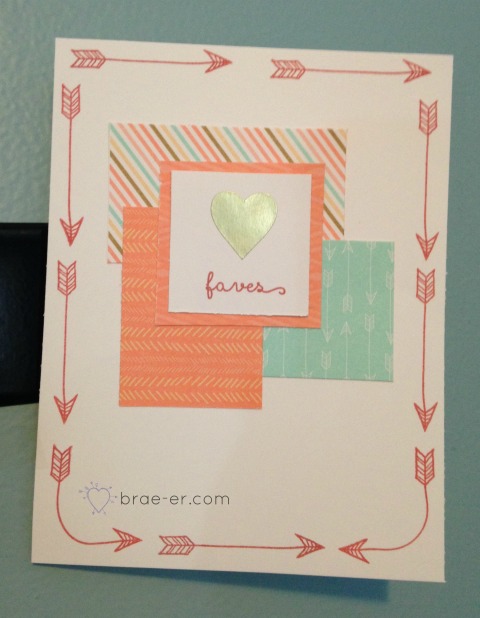
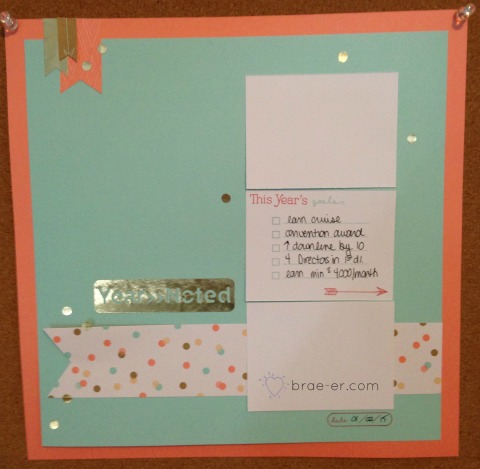
So what did I make with this wonderful paper! I started out with some cards and even made a layout! (I also had enough left over for a mini book using the Kraft album but I am saving that for another post).
The cards and layout I used were simply made and feature the January stamp of the month OR the Year Noted stamp set. I love the soft colours of this set and they are perfectly set off by the gold stickers!
My layout (still needs photos) is designed to hang in my craft space and remind me of my business goals for this coming year. Prettiest goal planner EVER!
Now hop on over to Roz’s blog to see the fabulous project she has to share!
The full list of hoppers is below and remember- share the love by leaving a comment!
1. Brae Montgomery- YOU ARE HERE!
2. Rosalynd Kelly : http://inmyscrappinroom.blogspot.com/2015/01/january-team-brae-er-blog-hop-year-noted.html
3. Chris Robertson http://chriscreativelife.blogspot.com/2015/01/january-brae-er-team-blog-hop.html
4. Krista Ritskes http://simplycreating.ca/?p=2187
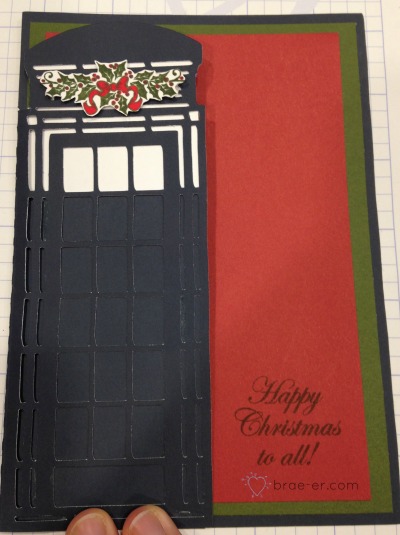
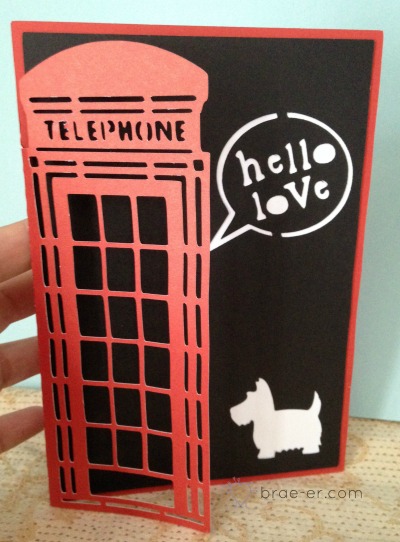
Just want to wish you a Happy Holiday Season with a cute card from Artfully Sent! If you are a fan of Dr. Who you will REALLY like this one!
I used the phone booth card (see below) and cut outdoor denim paper instead of the red. I had to look up a picture of the Tardis (to make sure I had the colours correct). I went through all my current Christmas stamps and found a sentiment that sounded very ‘British’ to me. I was very happy with the result!
I hope each and every one of you have a wonderful holiday season- make LOTS of magical memories and spend quality time with your loved ones!
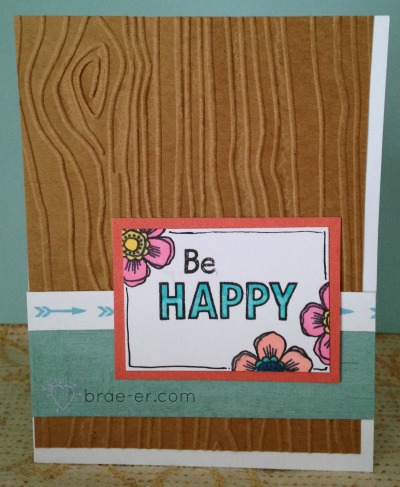
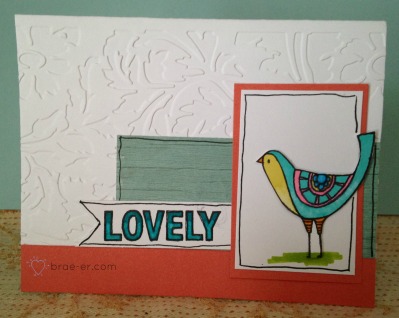
The only thing better than crafting is learning new techniques while you do it! For this ‘Technique Tuesday’ I am going to share a trio of cards using a variety of techniques!
Card #1: Be Happy
This card using embossing as well as the use of alcohol markers. To emboss you will need an embossing machine (any of them that will take a 5×7 folder will do) and one of our amazing embossing folders! If you have not seen all our designs yet then check out this link!
You place your paper in the folder, put it through your embossing machine and voila! For the above card I used the woodgrain embossing folder.
The flowers are coloured in with our alcohol markers- I stamped the outline image in black ink and then coloured. I love how our makers blend and look so bright and beautiful!
Card #2: Have a Beautiful Day
For this card I did a mix of dry embossing (with the embossing folder like card #1 but this time I used the honeycomb one) AND heat embossing. The feathers in the background and the arrow under the sentiment are both heat embossed. For this technique I used Versamark ink to stamp my image and then sprinkled embossing powder over the image. (click on embossing powder to see the colours we offer). I then heat set the powder and it becomes dry and glossy (and so pretty!). After I just coloured in the areas of the feathers left exposed with alcohol markers.
Card #3: Lovely
This card uses more dry embossing (this time the whole front of the card was embossed in the floral folder) and more marker work. If you look at the ‘Lovely’ sentiment you will see I blended my markers to create an ombre look. You can achieve this by using a darker version of the colour on the top and slowly colouring to meet the lighter colour on bottom OR you can use any one marker and just add multiple layers of that colour where you want a darker shade. It will blend beautifully because you are using alcohol markers!
Here is a list of things used in the technique trio:
Embossing folders (woodgrain, honeycomb and floral)
Embossing powders (silver)
Heat gun
Versamark ink pad
Shin Han Touch Markers
Happy Birds stamp set
Seaside paper packet
Black journaling Pen (for the lines around the images)
and YES all of these things are available on my SHOP!
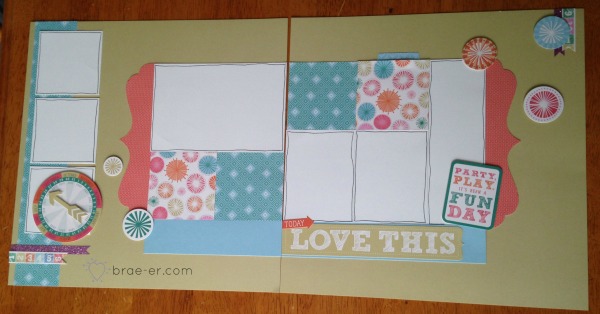
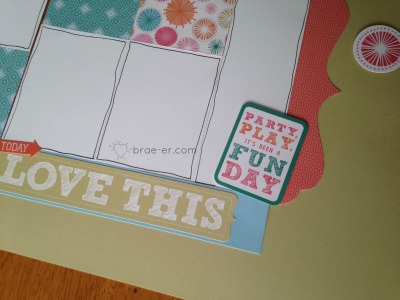
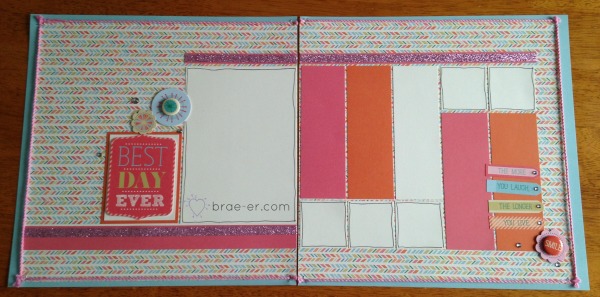
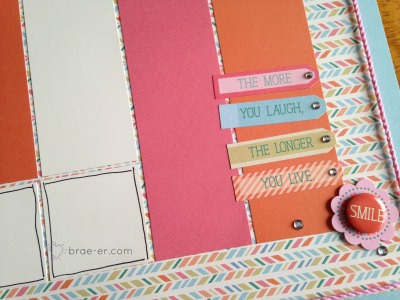
If you are at all like me then you find yourself quickly craving the bright colours of spring- pretty pinks and blues.. not bright enough to be summer colours but just enough to add some needed ‘pretty’ to a very white and black winter.
Well our winter really is only arriving but I already crave these colours so I am very happy that our Seasonal Inspirations Mini book has JUST what I need! Have you seen the beautiful Hopscotch papers??? Or the assortment or complements? YUMMY!
These two layouts were created using the above three items and with some added pink extra thick twine – all available now on my SHOP!
Want the directions for these two layouts? Purchase the pieces needed (through me of course) and I will email them to you free of charge!